How to connect BSNL FTTH modem to a WiFi Router
Hello everyone, sometimes we might face a situation where the modem provided by our service provider is a non-WiFi modem, or we might need to extend internet connectivity from the existing modem to another room. In both cases, all we need to do is simply connect the BSNL FTTH modem to a WiFi router.
In this post, I will guide you step-by-step on how to connect your BSNL FTTH modem to a WiFi router to either convert your network from a non-WiFi zone to a WiFi zone or extend your internet to another room.
Prerequisites:
- RJ 45 or LAN cable – To connect the BSNL FTTH modem to a WiFi Router.
- A Desktop/PC – To configure the WiFi Router.
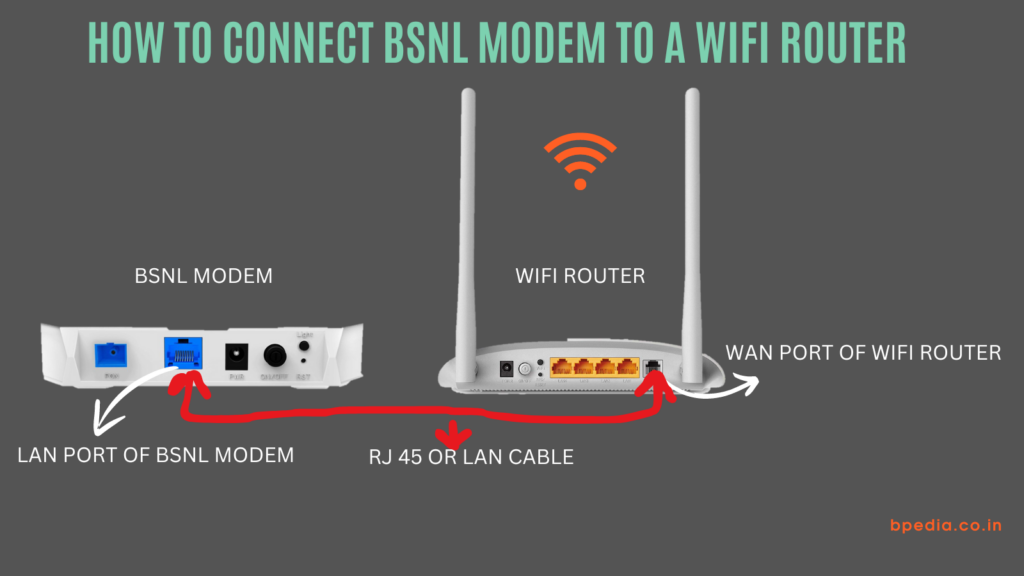
Step 1: Connect the BSNL FTTH Modem or ONT to the WiFi Router
This is a very simple process. If you are a newbie and do not know which cable to connect where, do not worry. Just read through this post.
A BSNL FTTH modem has LAN ports behind it, labeled as LAN. You need to connect an RJ 45 cable to one of these LAN ports and the other end of the cable to the WAN port of the WiFi router.
If you carefully observe the back panel of a WiFi router, there must be a port named WAN. This port works as a gateway. You need to connect the cable coming from the LAN port of the modem, which carries the internet, to the WAN port of the router.
It is that simple. Now let’s go to the next step, which is configuring the WiFi router.
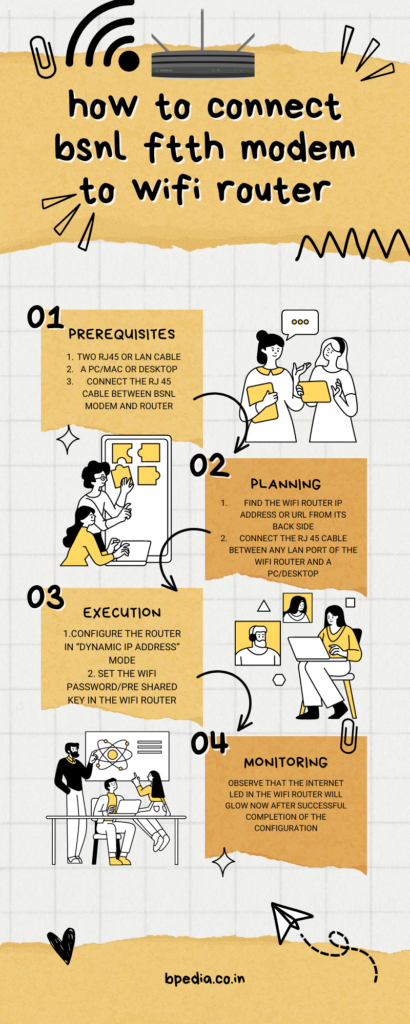
Step 2: Configuring the WiFi Router
This part is also easy. Just follow along with me.
Here you need a PC or a Desktop to configure the router. Nowadays, you can also configure the router easily from the mobile app of your router.
If you already have the mobile app of the router, for example, TP-Link has an app named TP-Link Tether, D-Link has D-Link WiFi, and Netgear has Netgear Nightwalk and Netgear Orbi. All these apps can be found in the Google Play Store or Apple App Store. The link to the app can be found as a QR code on the router’s packaging.
Configuring the router through these apps is smooth and hassle-free.
Anyway, if you want to configure the router using the web-based interface, follow these steps:
For TP-Link WiFi Router:
- Look for the wireless SSID/Name and wireless password printed on the back panel of the router and note it down.
- Turn on the WiFi of your PC/Desktop and connect to the TP-Link Router by entering the password printed on the back panel of the router.
- Open any browser and type http://tplinkwifi.net/ on its address bar and press Enter.
- You will be asked to enter the username and password (not the WiFi password), which can be easily found on the back panel of the router.
- Create the login password if you are prompted to.
- Follow the instructions and the Quick Setup wizard. Select your time zone.
- In the next step, you will be asked to choose the operation mode. Select the Wireless Router option.
- Then you will be asked to choose the WAN connection type. Select Dynamic IP Address or DHCP.
- At the final step, you need to create your WiFi name/SSID and WiFi/Wireless Password (WPA2-PSK).
That’s it. After successful configuration, you will notice that the INTERNET LED on the router will start glowing.
For D-Link Router:
- Look for the wireless SSID/Name and wireless password printed on the back panel of the D-Link router and note it down.
- Turn on the WiFi of your PC/Desktop and connect to the D-Link Router by entering the password printed on the back panel of the router.
- Open any browser and type 192.168.0.1(please check the correct IP address on the back panel of the router) on the address bar and press Enter.
- You will be asked to enter the username and password of the router. Check for the username and password (not the WiFi password) on the back panel of the router.
- In the next step, you will be asked to enter the Network Name, which is your WiFi name. The pre-shared key will be your WiFi password.
- Among options like Access Point, Router, Repeater, or Client, select the Router option.
- Select Connection Type/WAN Connection type as Auto Config (DHCP) or Dynamic IP.
- Save the configuration.
After successful configuration, you will notice that the internet LED on the D-Link Router will start glowing. Enjoy!
For Netgear Router:
- Look for the wireless SSID/Name and wireless password printed on the back panel of the Netgear router and note it down.
- Turn on the WiFi of your PC/Desktop and connect to the Netgear Router by entering the password printed on the back panel of the router.
- Open any browser and type http://routerlogin.net on address bar and press Enter.
- Let the Netgear Genie help you configure the router.
- In the next step, you will be asked to enter the Network Name, which is your WiFi name. The pre-shared key will be your WiFi password.
- Among options like Access Point, Router, Repeater, or Client, select the Router option.
- Select Connection Type/WAN Connection type as Auto Config (DHCP) or Dynamic IP.
- Finally, save your configuration, and you are ready to go.
Key Points to Remember While Configuring Any Router:
- SSID or Network Name is simply the WiFi name.
- The Pre-Shared Key is the WiFi password that you will use to connect to the internet.
- On the back panel of a router, there are 4 important details:
- URL or IP address to access the router from its web management portal.
- Router admin username and password to access the router settings.
- A default wireless password that can be used to connect to the router for the first time.
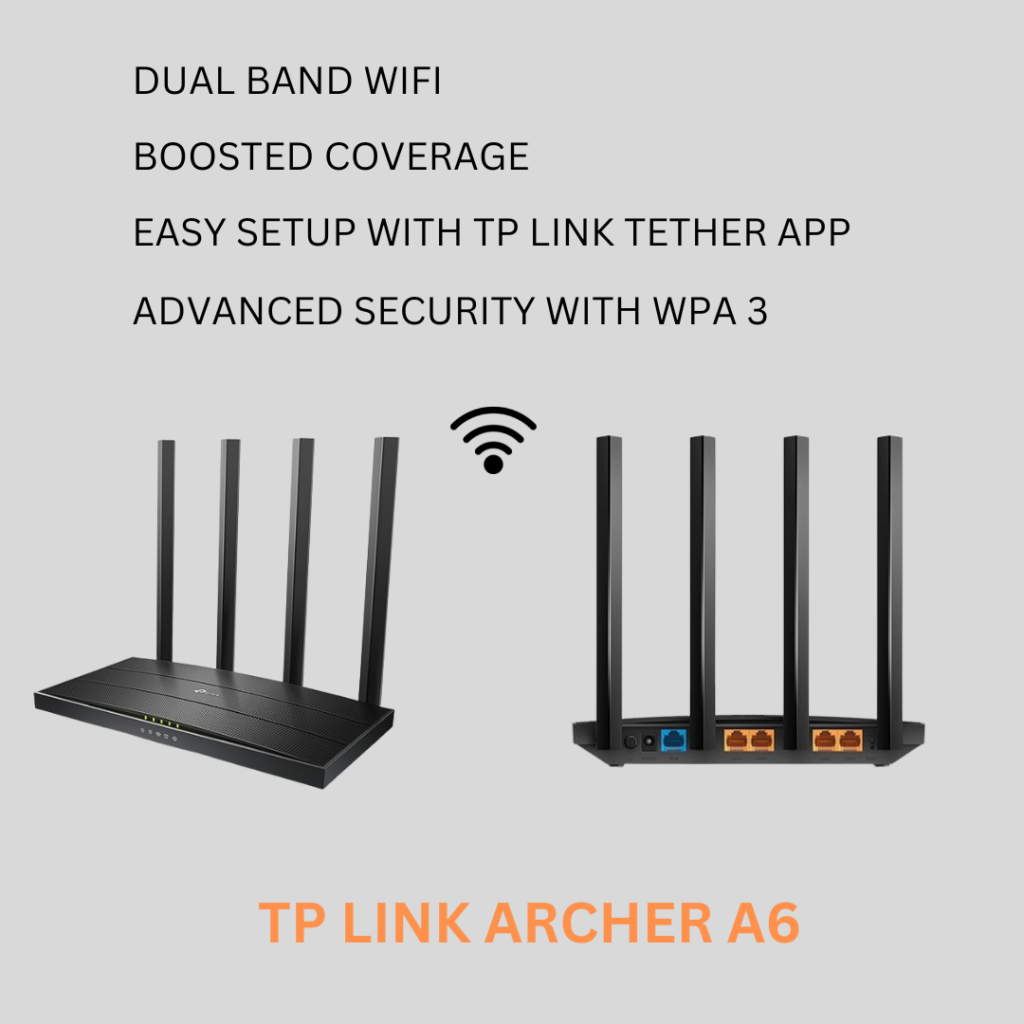
Recommended WiFi Router:
Here is my recommended router as TP-Link Archer A6, which boasts the following features:
- Dual Band WiFi Support: Operates on both 2.4 GHz and 5 GHz frequencies.
- Advanced WPA3 Security: Ensures a higher level of security for your network.
- Boosted WiFi Coverage: Provides a stronger and wider range of connectivity.
- High Speed: Offers speeds up to 867 Mbps.
- MU-MIMO Technology: Simultaneously transfers data to multiple devices for 2× faster performance.
I hope this helps you in connecting your BSNL FTTH Modem to any WiFi router. If you have any queries, feel free to post them in the comment section below. I will answer you promptly. Cheers!